In this post we are going to learn about how to install docker in ubuntu 14.04 LTS.Before getting stared , I would like to say all of the items here are mainly from docker documentation. And those who want to know what process will be for windows or Mac, here is the basic difference which we need to know before installation.
That means, you need additionally a VM(usually virtual box) on top of docker if it is not Linux. The virtual box VM will work as boot2Docker. We sill follow the things needed for Linux only. And all of the command here are in command line.
-
docker needs minimum Kernel version 3.10. To check kernel version :
uname -r


As both cases, they are 3.10+, we are set to go. There are two ways to install , I am including both ways.
Primary Installation:
-
I have tested in Ubuntu 14.04, 18.04, 19.10 : Preferable method for error free installation.
-
Check APT work with HTTP : If you dont have https enable for APT, just download certificate
sudo apt-get install apt-transport-https ca-certificates -
Add public key for server to download :
sudo apt-key adv --keyserver hkp://p80.pool.sks-keyservers.net:80 --recv-keys 58118E89F3A912897C070ADBF76221572C52609D -
Adding docker repository source : Go to this folder (/etc/apt/sources.list.d) and find a file docker.list. If you find, open this as root and delete any entry if you have. If you don’t have this file, create this file.
sudo touch docker.list
Now , edit this file
sudo gedit docker.list
and add this following repository name & save it
deb https://apt.dockerproject.org/repo ubuntu-trusty main
Optional : If you want to use multiple architecture(x64 & x86) , you may specify like this
deb [arch=amd64,i386] https://apt.dockerproject.org/repo ubuntu-trusty main
This will enable x86 & x64. I am only using x64.
Note : If you go that repository you will see following folders
    debian-jessie/
    debian-stretch/
    debian-wheezy/
    ubuntu-precise/
    ubuntu-trusty/
    ubuntu-utopic/
    ubuntu-vivid/
    ubuntu-wily/
If you Ubuntu version is not 14 (trusty), then you may use other destination. On this part is different then other Ubuntu versions.Now, Update APT
sudo apt-get update
-
verify APT is pulling from right repository
sudo apt-cache policy docker-engine
-
To check, if APT is not getting from old repo,
sudo apt-get purge lxc-docker

-
Get Linux Image Extra kernel, To do that
sudo apt-get install linux-image-extra-$(uname -r) -
It will update the current extra image kernel. If you are in latest , you don’t need. to run this. You might see something like this.
-
We need apparmor, for application security. So, if you dont have apparmor, you can install
sudo apt-get install apparmor -
By default apparmor used to present in ubuntu 14. So, you may see like this.
-
We need both generic and required kernel. So, Update APT and
sudo apt-get install -y linux-image-generic-lts-trusty -
Reboot PC .
-
Finally we are in installation step!
sudo apt-get -y install docker-engine
Validate Installations :
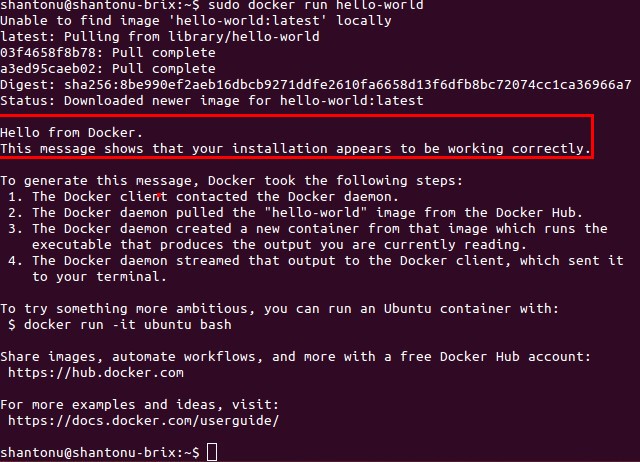
Let’s test installation.
sudo docker run hello-world
Optional Steps :
-
If you want to run docker as service , run this as service
sudo service docker start -
If you want to add an user for docker , (I am putting my name)
sudo usermod -aG docker shantonu -
Reboot PC(or log out) . Now you can use docker without root rights. If you try
docker run hello-world
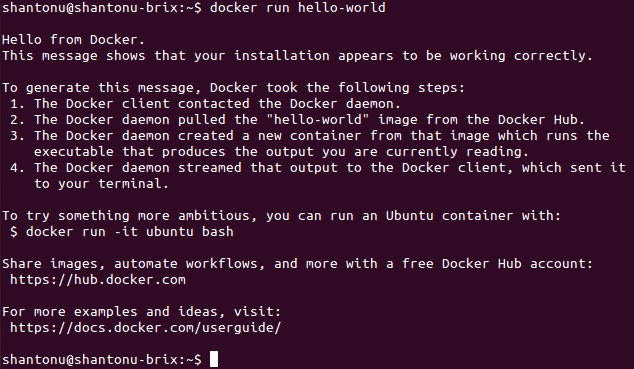
Finally Installation is complete.
Alternative Installation :
- tested in Ubuntu Mate 14, based on LTS
-
Step 1 : Install CURL (skip if you already have)
sudo apt-get install -y curl
Step 2 : Download & install docker
curl -fsSL https://get.docker.com/ | sh
It will prompt for root credential , you need to provide that.
-
Optional step : Adding an user (i am adding my username, so that I do not need root rights each time I use docker) :
sudo usermod -aG docker shantonu -
And now, try hello world : (add sudo if you haven’t add user)
docker run hello-world
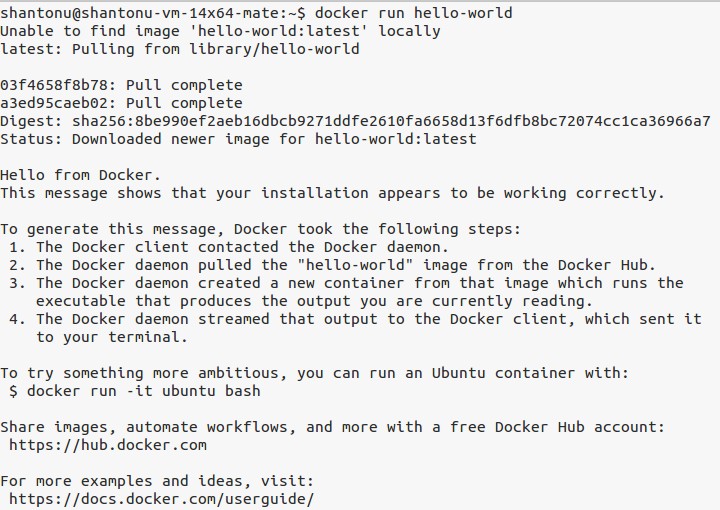
And, installation is complete.
Configure Docker for development
- it will allow to use docker complete for development. These are mainly permission or admin related things.
-
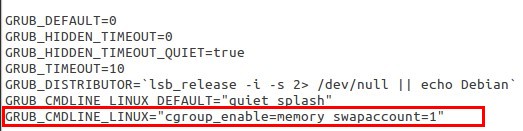
Using swap memory if you have less Ram : Edit grub as root etc/default/grub
sudo gedit /etc/default/grub -
And add this line
GRUB_CMDLINE_LINUX="cgroup_enable=memory swapaccount=1"
-
Now , save & update grub
sudo update-grub
UFW firewall entry :
-
To know the status of you PC of UFW, type this (you may avoid verbose)
sudo ufw status verbose

-
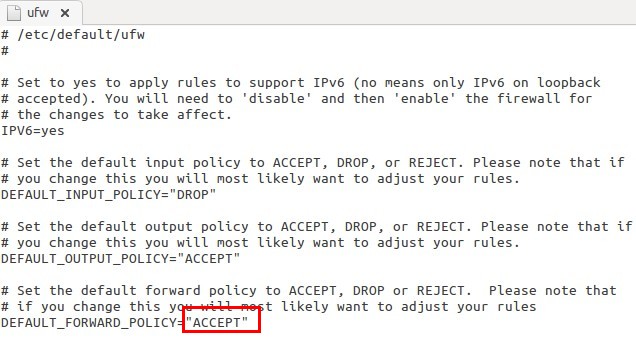
I am not using after by default , so inactive.if you are using firewall(you should) , Change DEFAULT_FORWARD_POLICY, DROP to ACCEPT
sudo gedit /etc/default/ufw
-
Save & close file. And, now Reload UFT
sudo ufw reload -
Add Docker port for incoming container request.
sudo ufw allow 2375/tcp

Configure DNS :
-
We need to add DNS entry for our Docker outgoing calls. Usually /etc/resolv.conf shortcut used to have local host entry.
gedit /etc/resolv.conf

-
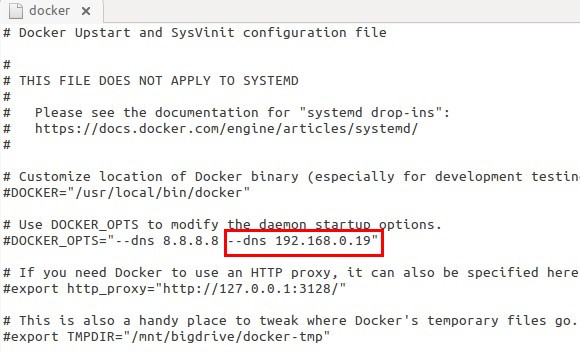
So, Docker access this & when try to use, it cant as it is used by our Ubuntu. So, Docker try using default Google Public DNS servers 8.8.8.8 8.8.4.4 . We need to make this DNS entry to our Local host IP address. So, know your IP address by ifconfig and use that. In my case it is 192.168.0.19. So,
sudo gedit /etc/default/docker
-
And add your local address. Now, as you can see we can add multiple DNS address, so, if your PC connected to multiple network (wifi, lan etc) , you should add those address so that each time you change network, you dont need to add dns.
- Save & close file.
-
restart docker
sudo restart docker
We are ready to use docker in Ubuntu.
Thanks.. :)