In this article we are going to see how can we apply Java Threading. This is very basic without Executor service. We can apply threading in two ways.
- Extending Thread class : Which is self executable (can run directly)
- Implement runnable interface : Which is not self executable , need to include a thread to execute this.
Basically they are operated by same technique, if you see Thread class which is implementing runnable interface. That we will override. Let’s see those two
Extending Thread class :
We need to first extend from thread class. I am creating MyThread class which extends Thread
public class MyThread extends Thread{
    public MyThread(){
        this("No Name Provided");
    }
    public MyThread(String name) {
        super.setName(name);
        System.out.println("Extended Thread Created: " + name
                            +" : Status ->"+super.getState().toString());
    }
    public MyThread(Runnable arunnable, String name) {
        super(arunnable, name);
        System.out.println("Extended Thread Created with runnable : " + name
                            +" : Status ->"+super.getState().toString());
    }
    @Override
    public void start(){// Changed start
        super.start();
        System.out.println("Thread started "+super.getName()
                            +" : Status ->"+super.getState().toString());
    }
    @Override
    public void run() {// Changed run
        System.out.println("Thread is running "+super.getName()
                            +" : Status ->"+super.getState().toString());
    }
}
In each initiation, I provide print so that we can understand how it is working. Now, lets see we make a method under main that calls my thread to run.
public static void runThreadByExtendingThread(){
        MyThread t;
        for(int i=0; i<=5; i++){
            t=new MyThread("T Name : "+i);
            System.out.println("Thread Created, Serial = "+i
                            +", Name :"+t.getName() +" ID : "+t.getId()
                            +" Status : "+t.getState().toString());
            t.start();
            System.out.println("Thread started, Serial = "+i
                                +", Name :"+t.getName() +" ID : "+t.getId()
                                +" Status : "+t.getState().toString());
        }
    }
And adding this to main
public static void main(String[] args) {
        try{
            runThreadByExtendingThread();
        }catch(Exception e)
        {
            e.printStackTrace();
        }
    }
If we run this , we can see following in console
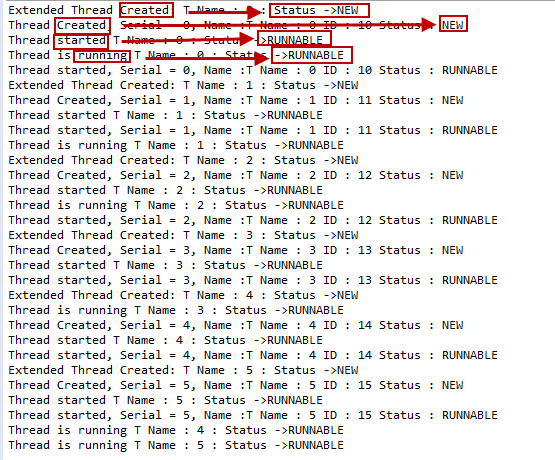
So, from here, we can see, how status is changing for a particular thread. I pointed about initial created thread(0th)
Benefits :
- We can implement our own type of execution engine by overriding inherited method.
- Full execution unit is in our control, so we can design full work flow type environment inside JVM in controlled way. This is very useful while designing your own framework or custom UI component or even custom test runner.
Weak points :
As we have to inherit, so, only our custom thread cant be inherit more.
Implement runnable interface :
This is so simple. We need to implement runnable and override run() method.
This is our main execution engine. So, we make our own method runnable and then initiate with a thread, then the thread runs this. So, I am making my own Runnable class MyRunnable
public class MyRunnable implements Runnable{
    private static int counter=0;// to see how many time it is calling run()
    public MyRunnable(){
    }
    @Override
    public void run() {
        System.out.println("Runnable is running at -> runnable counter "+counter++);
    }
}
And, like as previous method, make a method to call this.
public static void runThreadByImplementRunnable(){
        MyRunnable runnable;
        Thread t2;
        for(int i=0; i<=5; i++){
        runnable = new MyRunnable();
        t2=new Thread(runnable,"T Name : "+i);
        System.out.println("Thread Created, Serial = "+i
                                        +", Name :"+t2.getName()
                                        +" ID : "+t2.getId()
                                        +" Status : "+t2.getState().toString());
        t2.start();
        System.out.println("Name :"+t2.getName()
                            +" ID : "+t2.getId()
                            +" Status : "+t2.getState().toString());
    }
    }
And, calling this method from main
public static void main(String[] args) {
        try{
            runThreadByImplementRunnable();
        }catch(Exception e){
            e.printStackTrace();
        }
}
If we run this we can see following in command line
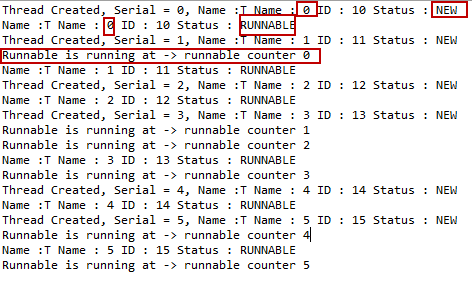
From here, we can , initial thread (oth) created and running our run() method. we can see step by steps execution .
Thread 0, created –> become runnable and then start our run() method. And between that, another created.
Note : Thread use start() to call run(), it is better not to call run() method by our self.
Why? you can see in thread class, jvm make some steps before calling run to make it safe.
Benefits :
- This is faster way to implement
- No barrier on extending class, so, just implementing runnable is enough.
Weak points :
We cant have control on execution environment.
Source
Thanks.. :)