In this article we are going to see how can we make a Data Driven testing with Junit. For this I am going to use a library called EasyTest. For TestNG , as we know, it has built in data provider. Using easy test, we cam use Junit to do data driven tests.
What is Data Driven Testing ?
When you testing is driven by your data then it refers to data driven testing. Formal definition can be found in wiki. In summary , your input data, expected output, configuration etc will be parameterized. So, in the end, you do not need to change your tests but with change of data, you can increase number of tests as well as coverage. That means, your data drives your testing capacity as well as quality.
This is very good approach when you need to deal with large amount of data with different permutation and combinations.
Where I use this approach?
- When I need to check big number of data and its out put against DB query or web api methods(REST/SOAP).
- When I need to drive the same UI tests with different data combinations.
- When I need to isolate date changing behaviors over configuration changes.
How we are going to achieve?
We are going to resolved this by parameterized tests. And this parameters will take values(test data) form our defined files. This is the missing part from TestNG with Junit. We will resolve using EasyTest library.
Note : This is not the only cause we are using Easy test. Easy test also have a lot of impressive features. We will see one by one. Here is the easy test project link in github.
Let’s learn with Example
For learning , I am using simple calculator. Just adding two numbers and expecting a result all in Double type.
public class Calculator {
    public Double add(Double a, Double b){
        return a+b;
    }
}
And, lets make a test case without Easy Test.
public class SimpleTest extends DataDrivenTest{
    @Test
    public void testAddition(){
        Assert.assertEquals(25.5,calculator.add(10.5,15.0),0.01);
    }
}
We will evolve this simple test case using Easy Test. So, lets start with making a project.
Step A : Creating Maven Project
- Create a maven project with you favorite group id and artifact id. (I used org.automation & datadriven)
- Include following Dependencies.
- For Junit4
<dependency> <groupId>junit</groupId> <artifactId>junit</artifactId> <version>4.12</version> </dependency> - For Easy Test
<dependency> <groupId>org.easetech</groupId> <artifactId>easytest-core</artifactId> <version>1.4.0</version> </dependency> - And for logging (this is optional)
  <dependency>
      <groupId>org.slf4j</groupId>
      <artifactId>slf4j-api</artifactId>
      <version>1.7.21</version>
  </dependency>
  <dependency>
      <groupId>org.slf4j</groupId>
      <artifactId>slf4j-log4j12</artifactId>
      <version>1.7.21</version>
  </dependency>
This will be enough to use easy test internal logging
Now, to provide data parameter, we need to include our data files. As best practice, i will put all of my data as resources. So, i need to include as resource in pom. So, finally project pom.xml looks like this.
<?xml version="1.0" encoding="UTF-8"?>
<project xmlns:xsi="http://www.w3.org/2001/XMLSchema-instance"
xmlns="http://maven.apache.org/POM/4.0.0"
xsi:schemaLocation="http://maven.apache.org/POM/4.0.0 http://maven.apache.org/xsd/maven-4.0.0.xsd">
    <modelVersion>4.0.0</modelVersion>

    <groupId>org.automation</groupId>
    <artifactId>datadriven</artifactId>
    <version>1.0-SNAPSHOT</version>

    <dependencies>
        <!--Only mandatory part : start-->
        <dependency>
            <groupId>org.easetech</groupId>
            <artifactId>easytest-core</artifactId>
            <version>1.4.0</version>
        </dependency>
        <dependency>
            <groupId>junit</groupId>
            <artifactId>junit</artifactId>
            <version>4.12</version>
        </dependency>
        <!--Only mandatory part: End -->
        <dependency>
            <groupId>org.slf4j</groupId>
            <artifactId>slf4j-api</artifactId>
            <version>1.7.21</version>
        </dependency>
        <dependency>
            <groupId>org.slf4j</groupId>
            <artifactId>slf4j-log4j12</artifactId>
            <version>1.7.21</version>
        </dependency>
    </dependencies>
    <build>
        <resources>
            <resource>
                <directory>src/test/resources</directory>
                <includes>
                    <include>**/*</include>
                </includes>
            </resource>
        </resources>
    </build>
</project>
Step B :Creating Data Files
- Easy test supports
- Excel : Office 97/2003 format (xls extension)
- CSV : Comma Separated Value
- XML
- JSON format via CSV files. Note : Easy test also supports custom data types (we will skip this part to make it simple)
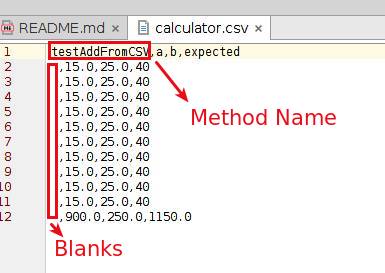
For CSV and EXCEL follow these rules
- First row , first column will be Method name (so, each row of this column will be blank)
- First row From 2nd column, all will be parameter variable name.
- All row of column where method name is written will be blank.
####CSV:
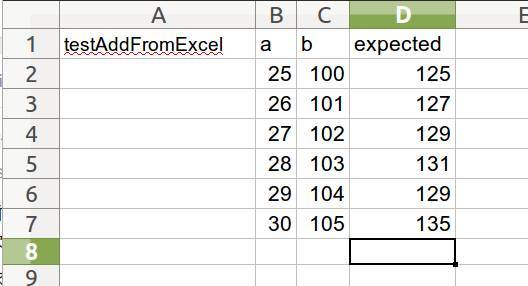
####Excel(.xls):
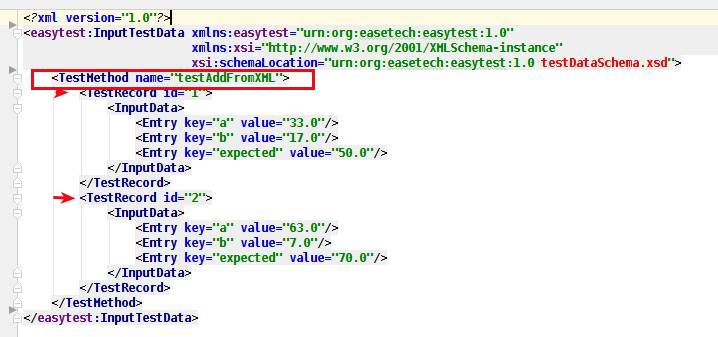
####XML:
You can see all of my files here
Now, Let’s load data from different data loader.To load data, commonly we are using annotations
- @DataLoader to define the source of the file.
- @Param to define which column data will be consider as item to get.
As this annotations are specific to Easy Test, we need to run this test class with DataDrivenTestRunner.class.
So, first we see CSV data loader.
@RunWith(DataDrivenTestRunner.class)
public class CSVLoaderExample extends DataDrivenTest {
    @Test
    @DataLoader(filePaths = "calculator.csv", loaderType = LoaderType.CSV)
    public String testAddFromCSV(@Param(name = "a") Double a,
                                 @Param(name = "b") Double b,
                                 @Param(name = "expected") Double expected) {
        Assert.assertEquals(expected, calculator.add(a, b), 0.1);
        return "success";
    }
    @Test
    @DataLoader(filePaths = "calculator2.csv")
    public void testAdd(@Param(name = "a") Double a,
                        @Param(name = "b") Double b,
                        @Param(name = "expected") Double expected){
        Assert.assertEquals(expected, calculator.add(a,b),0.1);
    }
}
In here , you can see, I am
- running the test with DataDrivenTestRunner.class
- loading calculator.csv (and other one also)
- getting parameter with name a, b, expected.
Here is the CSV file content look like
testAddFromCSV,a,b,expected
 ,15.0,25.0,40
 ,15.0,25.0,40
 ,15.0,25.0,40
 ,15.0,25.0,40
 ,15.0,25.0,40
 ,15.0,25.0,40
 ,15.0,25.0,40
 ,15.0,25.0,40
 ,15.0,25.0,40
 ,15.0,25.0,40
 ,900.0,250.0,1150.0
How a row is handled?
Easy test consider each row as one record and it will iterate our tests based on number of row present in the data file. So, define column for input data is more than enough.
Best Practice : I used to follow a single file to provide input data as well as expected output. You may use separate file for that. In the same way, if we look at excel data loader
@RunWith(DataDrivenTestRunner.class)
public class ExcelLoaderExample extends DataDrivenTest {
    @Test
    @DataLoader(filePaths = "calculator.xls", loaderType = LoaderType.EXCEL)
    public void testAddFromExcel(@Param(name = "a") Double a,
                                 @Param(name = "b") Double b,
                                 @Param(name = "expected") Double expected) {
        Assert.assertEquals(expected, calculator.add(a, b), 0.1);
    }
    @Test
    @DataLoader(filePaths = {"calculator2.xls"})
    public void testAdd(@Param(name = "a") Double a,
                        @Param(name = "b")Double b,
                        @Param(name = "expected")Double expected){
        Assert.assertEquals(expected, calculator.add(a,b),0.1);
    }
}
And XML data loader
@RunWith(DataDrivenTestRunner.class)
public class XMLLoaderExample extends DataDrivenTest {
    @Test
    @DataLoader(filePaths = "calculator2.xml", loaderType = LoaderType.XML)
    public String testAddXMLOutput( @Param(name = "a") Double a,
                                    @Param(name = "b") Double b,
                                    @Param(name = "expected") Double expected) {
        Assert.assertEquals(expected, calculator.add(a, b), 0.1);
        return "success";
    }
}
Note :
- File paths contains physical path , if the file is in classpath, file name is enough. So, when I am defining my pom.xml resources , we should include our data file to make it work like this. Or we have maintain proper path for input.
- If you use single file loading, you may avoid LoaderType parameter.
- When you are using multiple same type file to load, make sure you do not have same column name. If same, columns form 2nd or later file will be honored. (Lifo way, last file will be honored)
- Does not supports different type of loader in same method. So, you can not load Excel & CSV for the same method with single data loader. Only first one will be working.
- Single method/class does not supports multiple data loader annotation.
- Method level data loader will overload class level data loader.
- Use class level data loader when you are using a single file for multiple test method’s parameters.
- In param, data used convered in Long, String, Double format. But we can use custom data type with our own parsers. Easy test has interface for this. (use AbstractConverter
) - If we need to customize this parameter data showing, we can use @Display annotation when with loader. you can see an example here.
Here are some examples for multiple data loader :
@RunWith(DataDrivenTestRunner.class)
public class MultipleDataLoaderExample extends DataDrivenTest {
    // only the first loader will be working..
    // in here "calculator2.csv"
    @Test
    @DataLoader(filePaths = {"calculator2.csv","calculator3.xml"})
    public void testAdd(@Param(name = "a") Double a,
                        @Param(name = "b")Double b,
                        @Param(name = "expected")Double expected) {
        Assert.assertEquals(expected, calculator.add(a, b), 0.1);
    }
}

@RunWith(DataDrivenTestRunner.class)
public class MultipleDataLoaderExampleSameType extends DataDrivenTest{
    @Test
    @DataLoader(filePaths = {"calculator3.csv","calculator2.csv"})
//calculator2 is accepted not 2=> why, it honors the last item, top item of the array list of files
    public void testAdd(@Param(name = "a") Double a,
                        @Param(name = "b")Double b,
                        @Param(name = "expected")Double expected){
        Assert.assertEquals(expected, calculator.add(a,b),0.1);
    }
}
So, you may see more detail examples from here.
Now, beside Data loading , Easy test has lot of other features. I am not going details but I have examples for each one. So, I am adding one by one with small explanation.
Reporting :
Easy test provide really easy reporting… :). Just use annotation. Here are some examples
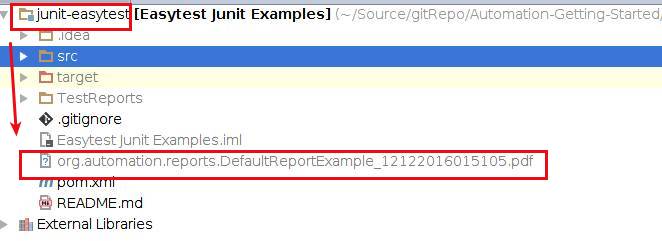
Default Report :
- PDF type & stored in user directory
@RunWith(DataDrivenTestRunner.class)
@Reportpublic class DefaultReportExample extends DataDrivenTest{
  @Test
  @DataLoader(filePaths = "calculator2.xls")
  public void testAdd(@Param(name = "a") Double a,
                      @Param(name = "b") Double b,
                      @Param(name = "expected") Double expected) {
      Assert.assertEquals(expected, calculator.add(a, b), 0.1);
  }
}
Report with classpath changing in classpath
- reports stored in build directory , target folder in maven . A folder name TestReports will be created
@RunWith(DataDrivenTestRunner.class)
@Report(outputLocation = "classpath:TestReports")
public class ClassPathExampleReport extends DataDrivenTest{
  @Test
  @DataLoader(filePaths = "calculator.xls")
  public void testAddFromExcel(   @Param(name = "a") Double a,
                                  @Param(name = "b") Double b,
                                  @Param(name = "expected") Double expected) {
      Assert.assertEquals(expected, calculator.add(a, b), 0.1);
  }
  @Test
  @DataLoader(filePaths = "calculator2.xls")
  public void testAdd(@Param(name = "a") Double a,
                      @Param(name = "b") Double b,
                      @Param(name = "expected") Double expected) {
      Assert.assertEquals(expected, calculator.add(a, b), 0.1);
  }
}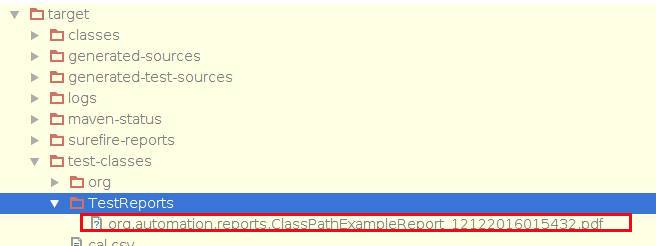
Report with classpath changing in folder path
- we specify in our file system
@RunWith(DataDrivenTestRunner.class)
@Report(outputLocation = "file:TestReports")// default location = project working directory
public class CustomPathExampleReport extends DataDrivenTest{
  @Test
  @DataLoader(filePaths = "calculator.xls")
  public void testAddFromExcel(@Param(name = "a") Double a,
                               @Param(name = "b") Double b,
                               @Param(name = "expected") Double expected) {
      Assert.assertEquals(expected, calculator.add(a, b), 0.1);
  }
  @Test
  @DataLoader(filePaths = "calculator2.xls")
  public void testAdd(@Param(name = "a") Double a,
                      @Param(name = "b") Double b,
                      @Param(name = "expected") Double expected) {
      Assert.assertEquals(expected, calculator.add(a, b), 0.1);
  }
}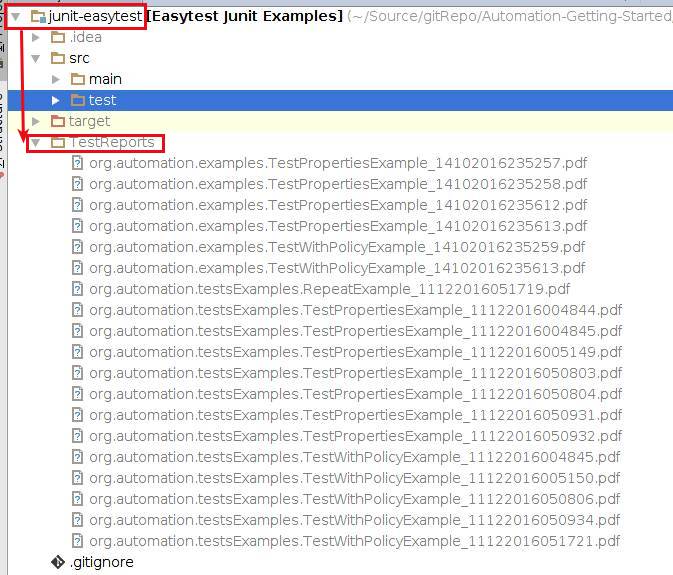
Notes
- There are two type of report functional test report and performance test report(includes time to run tests). We can create multiple report type.
- Report making is slow, so the time of report making will be included as test execution time
- There are 3 type of report file format. Excel, PDF & HTML where pdf is the default choice. We can create multiple report type format.
- @Report can be used in class level which means, when generated, it includes all test method results.
- Report location can be stored specific file path or in build directory, class path. Class path report will be cleared when we use mvn clean, so choose carefully.
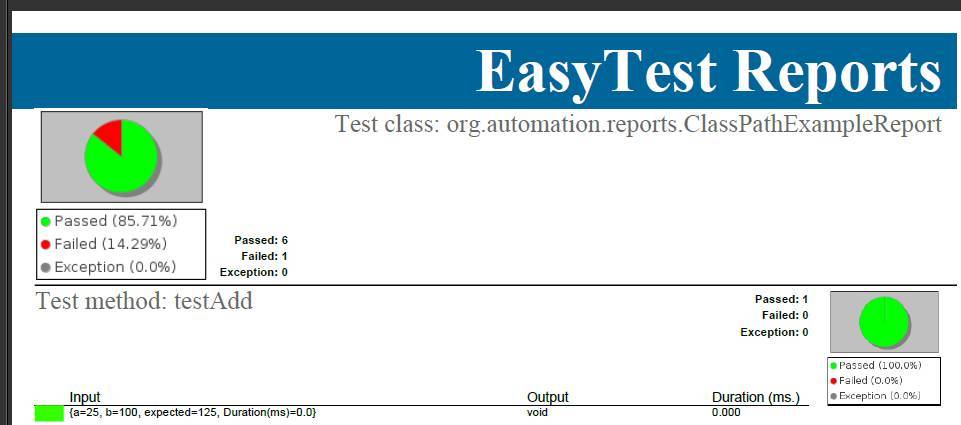
A pdf report sample :
Parallel Threads
Easy test has a simple annotation @Parallel where we can define how many thread JVM will allocate to test for a test class.
@Parallel(threads = 5)//this is very fragile
public class ParallelTestExample extends DataDrivenTest_withDefaultAnnotation {
    @Test
    @DataLoader(filePaths = "calculator.xls", loaderType = LoaderType.EXCEL)
    public void testAddFromExcel(@Param(name = "a") Double a,
                                 @Param(name = "b")Double b,
                                 @Param(name = "expected")Double expected){
        Assert.assertEquals(expected, calculator.add(a,b),0.1);
    }
}
You can see, this test will run with 5 threads. We can run our test suit parallel also with @ParallelSuite
@RunWith(Suite.class)
@ParallelSuite(threads = 3)
@Suite.SuiteClasses({RepeatExample.class, TestWithPolicyExample.class})
public class ParallelSuitExample {
}
Note : this is very fragile. It might create resource allocation errors. And easytest does not ensure these are concurrent.
Test Repetition
In Easy Test , we can repeat a test method with annotation @Repeat.
@RunWith(DataDrivenTestRunner.class)
@TestPolicy(PolicyExample.class)
public class RepeatExample extends DataDrivenTest {
    @Test
    @Repeat(times = 5)
    public void testAddFromExcel(@Param(name = "a") Double a,
                                 @Param(name = "b") Double b,
                                 @Param(name = "expected") Double expected) {
        Assert.assertEquals(expected, calculator.add(a, b), 0.1);
    }
}
It’s a serially running, not parallel.
Test Property
Easy test has a nice annotation @TestProperties which can be used to directly inject test property from class path.
public class TestPropertiesExample extends DataDrivenTest_withDefaultAnnotation {
    @TestProperties(value = {"test.properties"})
    private Properties myProps;
    @Test
    public void testAddition() {
        Assert.assertEquals("Easy Test Demos", myProps.getProperty("test.title"));
    }
}
Ignore the extends part, that is not needed. To keep test nice, i used. you can see form github sources
Test Policy
Test policy is very useful thing in Easy test where we can define test policy in a separate class and use it in test class.For this define a policy class.
@Ignore
@Parallel(threads = 2)
@Report(reportTypes = { Report.REPORT_TYPE.DEFAULT,
                        Report.REPORT_TYPE.METHOD_DURATION},
                        outputFormats = Report.EXPORT_FORMAT.PDF,
                        outputLocation = "file:TestReports")
@DataLoader(filePaths = "calculator.xls")
// i prefer data loader should be with method@Display(fields = "id")
public class PolicyExample {
}
And Use it in a test class
@RunWith(DataDrivenTestRunner.class)
@TestPolicy(PolicyExample.class)
public class TestWithPolicyExample extends DataDrivenTest {
    @Test
    public void testAddFromExcel(@Param(name = "a") Double a,
                                 @Param(name = "b") Double b,
                                 @Param(name = "expected") Double expected) {
        Assert.assertEquals(expected, calculator.add(a, b), 0.1);
    }
}
So, we can see, the policy will define data file + reporting and parallel threads for the threads.
Where to use?
- While testing , if we feel to have test configuration separately.
- When we have seperate testing configuration to run in different situation. Like test in dev PC , or in CI, or for test reporting , or differenty type of testing, etc.
Cons :
- Error messages are not user friendly. So debugging is not easy. you need to know easy test architecture to understand errors.
- Parallel execution might cause error related resource locked or busy.
- Blank character in excel or CSV might cause error. So, be careful while creating data file.
- There are some known bugs present. One of popular bug is, test fail report only generated with excel data loader. Other data loader can not generate fail test reports(only pass test report generated).
I hope this post will help to use EasyTest.
Source
Todo : Custom Data Type Converter Example. I will add gradually.
I love to have comments in my blog.
Thanks.. :)