In this article we are going to see how to use Allure report in our Junit tests. For testng and other frameworks, i will provide separate posts. Let’s start.
What is Allure?
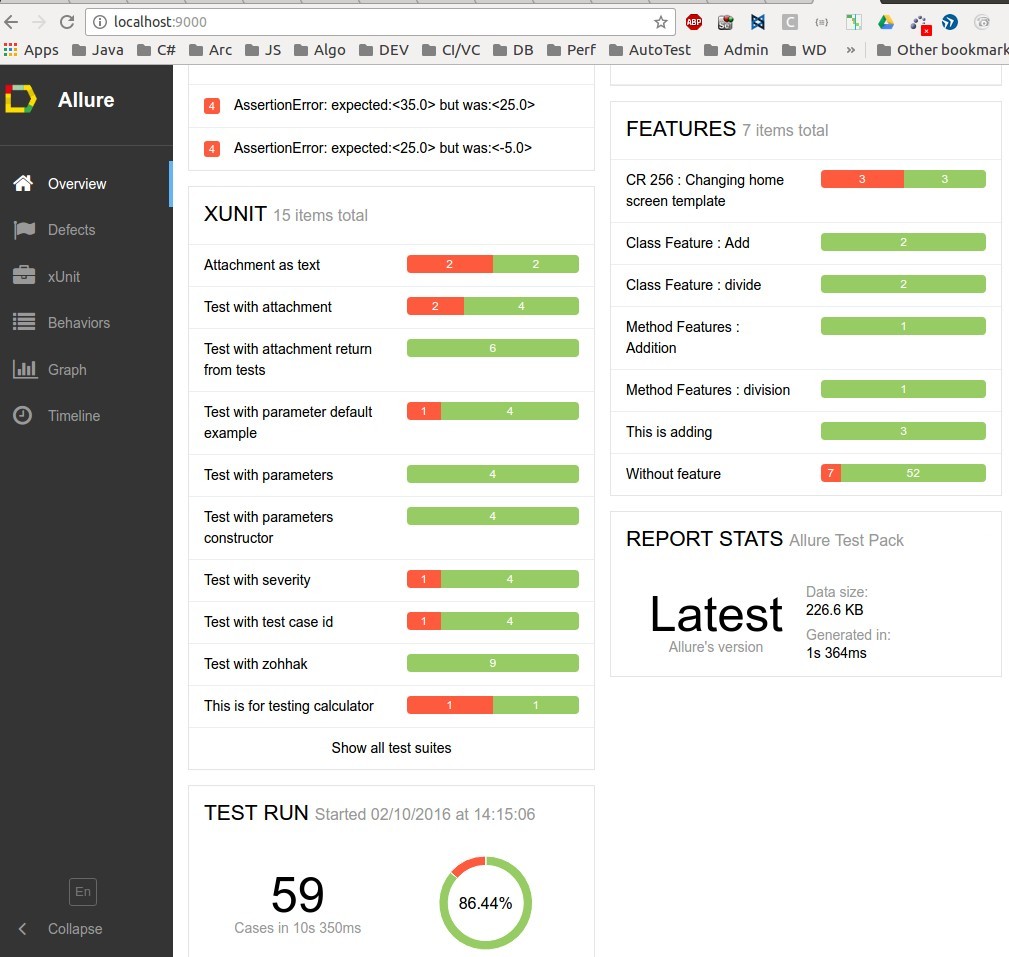
Allure test report framework. After unit tests, we used see reports either from IDE built-in plug-ins or CI plug-ins. Allure provide supports for both local and CI plugins. And we can see report in very modern way(a responsive java script application to show your results).Here is the first look of the home page.
- version : 1.4.24.RC3
Details :
The collapsible left bar has different sections :
- Overview is the home page, as we can see : Contains summary of the test execution.
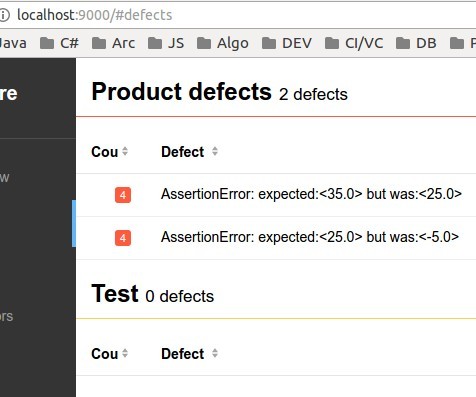
- Defects section has all tests which are failed or having errors. (junit event listener based)
- xUnit section represents all tests considering test class/method names as the title if that are not specified. So, its all about test implementation prospective view. You can see all of your implemented test info in this view.This view is useful for developers or QAs who knows about test details.

- Behaviors section, which represents same test cases but in BDD view. In Allure, we can represent a test in BDD prospective by adding @Feature & @Stories. If any test does not have those, it will be showing without feature/stories.
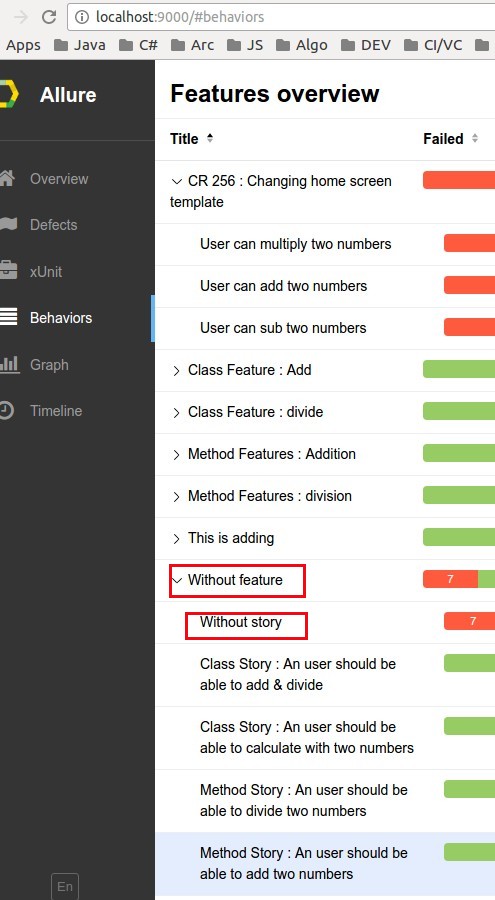
This view is very useful for stakeholders, business analyst, QA managers or manual QA who actually sees the application from requirement prospective. This is a very useful way to get traceability view as well as coverage measurements.
- Graph section shows the summary with % graph, priority & duration based test execution view.
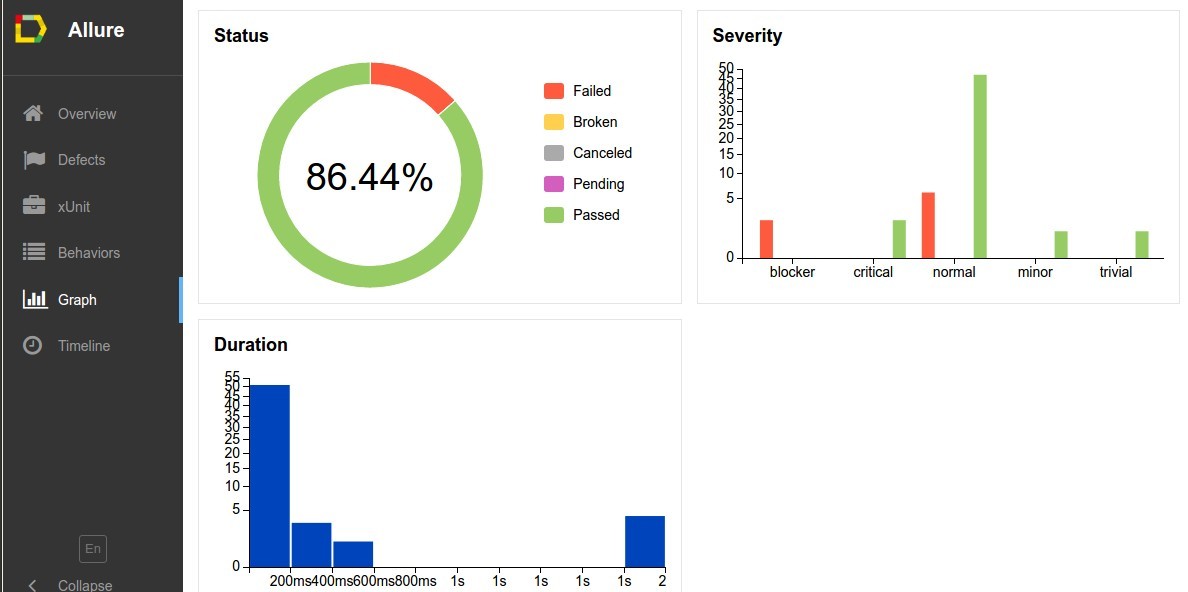
This donuts chart may vary from version to version. Initially it was pie chart.
- Timeline section represents what test performs when.

This is very important view if your test runs in multiple hosts. You can see my PC name is mentioned(shantonu-brix), in case your test runs in multiple hosts, they will be mentioned in separate block. Very useful when your selenium test runs in multiple hosts and you can see them separately.
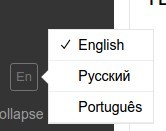
- And, Multi Language Support :
Allure in CI/CD :
- Allure Command line options
- Allure Maven Plugin (that exactly what I have used)
- Allure Jenkins Plugin (I will provide separate blog post for this)
- Allure TeamCity Plugin
- Allure Bamboo Plugin
Lets start with initial project setup. The example project that i am going to use is also available in github.
Step 1
Craate maven project in your favorite IDE (i use intellij) with proper package name & group id.
Step 2
Use maven 3.3.9 (I am using). Allure requirement is 3.1.1+.
Step 3
Let’s setup the project
Pom setup: This is the most important part. Open your project’s pom.xml
- Add all version in properties to manage
<properties>
    <jetty.http.port>9000</jetty.http.port>
    <project.build.sourceEncoding>UTF-8</project.build.sourceEncoding>
    <allure.version>1.4.24.RC3</allure.version>
    <aspectj.version>1.8.9</aspectj.version>
</properties>
- Add dependencies
<dependencies>
 <!-- allure -->
    <dependency>
        <groupId>ru.yandex.qatools.allure</groupId>
        <artifactId>allure-junit-adaptor</artifactId>
        <version>${allure.version}</version>
    </dependency>
  <!-- for zohhak example -->
    <dependency>
        <groupId>com.googlecode.zohhak</groupId>
        <artifactId>zohhak</artifactId>
        <version>1.1.1</version>
        <scope>test</scope>
    </dependency>
    <dependency>
        <groupId>junit</groupId>
        <artifactId>junit</artifactId>
        <version>4.12</version>
    </dependency>
  <!-- logging (optional) -->
    <dependency>
        <groupId>org.slf4j</groupId>
        <artifactId>slf4j-log4j12</artifactId>
        <version>1.7.14</version>
    </dependency>
</dependencies>
- Create build section
<build>
    <plugins>
        <plugin>
            <groupId>org.apache.maven.plugins</groupId>
            <artifactId>maven-surefire-plugin</artifactId>
            <version>2.19.1</version>
            <configuration>
                <argLine>
                    -javaagent:"${settings.localRepository}/org/aspectj/aspectjweaver/${aspectj.version}/aspectjweaver-${aspectj.version}.jar"
                </argLine>
                <properties>
                    <property>
                        <name>listener</name>
                        <value>ru.yandex.qatools.allure.junit.AllureRunListener</value>
                    </property>
                </properties>
            </configuration>
            <dependencies>
                <dependency>
                    <groupId>org.aspectj</groupId>
                    <artifactId>aspectjweaver</artifactId>
                    <version>${aspectj.version}</version>
                </dependency>
            </dependencies>
        </plugin>
        <plugin>
            <groupId>org.eclipse.jetty</groupId>
            <artifactId>jetty-maven-plugin</artifactId>
            <version>9.3.7.v20160115</version>
            <configuration>
                <webAppSourceDirectory>${project.build.directory}/site/allure-maven-plugin</webAppSourceDirectory>
                <httpConnector>
                    <port>${jetty.http.port}</port>
                </httpConnector>
                <stopKey>stop</stopKey>
                <stopPort>1234</stopPort>
            </configuration>
        </plugin>
    </plugins>
</build>
- Create reporting section
<reporting>
    <excludeDefaults>true</excludeDefaults>
    <plugins>
        <plugin>
            <groupId>ru.yandex.qatools.allure</groupId>
            <artifactId>allure-maven-plugin</artifactId>
            <version>2.5</version>
        </plugin>
    </plugins>
</reporting>
So, finally this will look like this
Notes:
- You can see the junit event listener ru.yandex.qatools.allure.junit.AllureRunListener. So if you using testng, changing this will work fine(example)
- Allure is dependent on AspectJ. So, you can see the dependency and version number present in properties section
-
AspectJ argument must be present in surefire plug-ins.
<argLine> -javaagent:"${settings.localRepository}/org/aspectj/aspectjweaver/${aspectj.version}/aspectjweaver-${aspectj.version}.jar" </argLine> -
You can see allure maven reporter. You can add other reporters here like maven test reporter but as I am using allure, I am excluding default ones.
-
I am using jetty plugins with specific port 9000. This port configuration is present in properties section. I needed jetty as I wanted to show reports in my local host URL. So, I am configuring to http://localhost:9000 to see the report. if you want to change this, just change the port number in this property
<jetty.http.port>9000</jetty.http.port> -
In jetty, you can see
<webAppSourceDirectory>${project.build.directory}/site/allure-maven-plugin</webAppSourceDirectory> This is important configuration that points allure report root directory. Please see details of this directory where i explain what happens on mvn site command.
Step 4
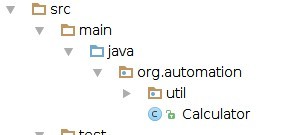
For this example , I am using simple Calculator class and test it.
public class Calculator {
    public double add(double a, double b){
        return a+b;
    }
    public double sub(double a, double b){
        return a-b;
    }
    public double mul(double a, double b){
        return a*b;
    }
    public double div(double a, double b){
        return a/b;
    }
    public double mod(double a, double b){
        return a%b;
    }
}
I am keeping this simple as the intention of this post is to learn allure framework integration not testing.
Step 5
In src/test/java, create the same package (in my case, org.automation) add an abstract class as test template and a test class as test like this.
public abstract class TestingCalculator {
    protected Calculator aCalculator = null;
    @Before
    public void init(){
        aCalculator = new Calculator();
    }
  }

public class TestCalculatorFullExample extends TestingCalculator {
    @Test
    public void testAddition(){
        Assert.assertEquals(25.0, aCalculator.add(10.0,15.0), 0.01);
    }
    @Test
    public void testSub(){
        Assert.assertEquals(25.0, aCalculator.sub(10.0,15.0), 0.01);
    }
}
So, we are done with project & its tests. Let’s use allure. I am adding allure different annotations and it’s effects.
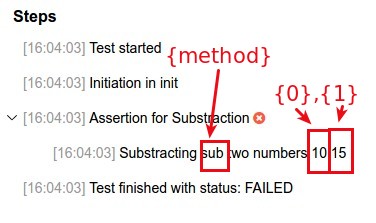
@Step : This is used for defining a method as a step. It can be private or public method but this represents a step for the test. It takes string parameter which will be used to tell details about the step.
- If you use {method} will actually get the method name.
- if you use {0} or up to .. {n} which will get the parameter of the method.
Example:
I am defining all method in calculator class as step which will show during the test on which method was called.
public class Calculator {
@Step("Adding two numbers")
public double add(double a, double b){
return a+b;
}
@Step("Subtracting {method} two numbers {0},{1}")
public double sub(double a, double b){
return a-b;
}
@Step("Multiplying two numbers : {0}x{1}")
public double mul(double a, double b){
return a*b;
}
@Step("Dividing two numbers : {0}/{1}")
public double div(double a, double b){
return a/b;
}
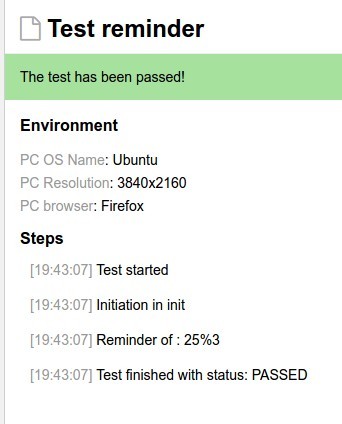
@Step("Reminder of : {0}%{1}")
public double mod(double a, double b){
return a%b;
}
}
Note : As you can see, in steps we will be able to know about the steps performing calculator functions.
- From allure reports. When we only text

And for the subtraction (intentionally failed scenario)
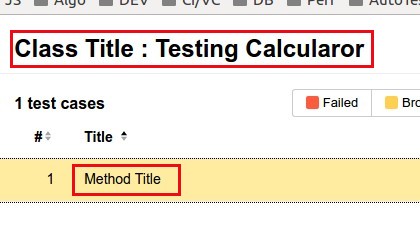
@Title : Add Custom Title for class & methods. It takes string as title. If we don’t use, it will be using class/method name with rule.
- If the name is camel case, it will separate each words with space
- If the name is under score(_) separated, it will replace underscore with space.like,
TestForAddition => Test With Description
Test_For_Multiplication =>Test For Multiplication
Example:
In the project , this test class
@Title("Class Title : Testing Calculator")
public class TestWithTitle extends TestingCalculator{
    @Test    @Title("Method Title")
    public void addition(){
        Assert.assertEquals(25.0, aCalculator.add(10.0,15.0), 0.01);
    }
}
- And in allure report
Note : {method} won’t work like step.
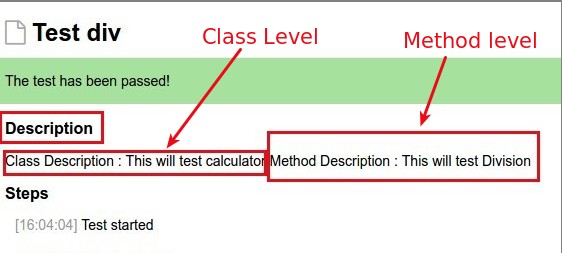
@Description : Like as Title, description also does the similar thing with classes/methods but in allure report, it is shown in description section.
Example :
@Description("Class Description : This will test calculator")
public class TestWithDescription extends TestingCalculator {
    @Test
    @Description("Method Description : This will test addiction")
    public void testAddition() {
        Assert.assertEquals(25.0, aCalculator.add(10.0, 15.0), 0.01);
    }
    @Test
    @Description("Method Description : This will test Division")
    public void testDiv(){
        Assert.assertEquals(5.0, aCalculator.div(250.0,50.0), 0.01);
    }
}
- In Allure report :
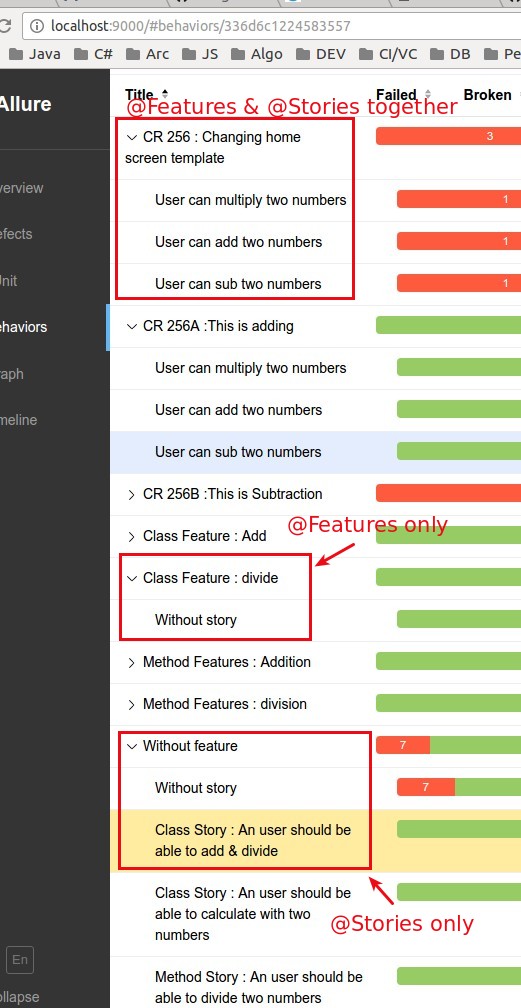
@Features and @Stories : Like as title display, allure support showing BDD wise test display in Behaviors tab by the help of @Features and @Stories. Usually relation is , A feature might have multiple stories. So, in behavior, we can see stories are staying under a feature. Both of them can be applied in class and method level. All items under same features will be grouped together (may be stayed under separated tests)
Example :
Two classes for separate examples
@Features(value = {"Class Feature : Add","Class Feature : divide"})
public class TestWithFeatures extends TestingCalculator{
    @Test
    @Features("Method Features : Addition")
    public void testAddition() {
        Assert.assertEquals(25.0, aCalculator.add(10.0, 15.0), 0.01);
    }
    @Test
    @Features("Method Features : division ")
    public void testDiv(){
        Assert.assertEquals(5.0, aCalculator.div(250.0,50.0), 0.01);
    }
}
@Stories(value = {"Class Story : An user should be able to calculate with two numbers",
        "Class Story : An user should be able to add & divide"})
public class TestWithStories extends TestingCalculator {
    @Test
    @Stories(value = "Method Story : An user should be able to add two numbers")
    public void testAddition() {
        Assert.assertEquals(25.0, aCalculator.add(10.0, 15.0), 0.01);
    }
    @Test
    @Stories("Method Story : An user should be able to divide two numbers ")
    public void testDiv(){
        Assert.assertEquals(5.0, aCalculator.div(250.0,50.0), 0.01);
    }
}
- In Allure reports :
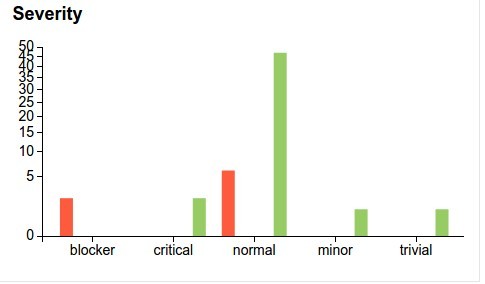
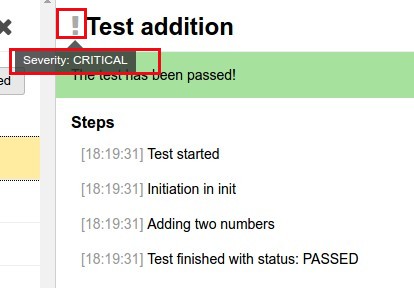
@Severity : We can specify a test (method) severity level with predefined levels from allure. BLOCKER, CRITICAL, NORMAL, MINOR, TRIVIAL This will categorize tests in graph and a symbol is put before test title with tool tip support of level description.
Example :
public class TestWithSeverity extends TestingCalculator {
    @Test
    @Severity(value = SeverityLevel.CRITICAL)
    public void testAddition() {
        Assert.assertEquals(25.0, aCalculator.add(10.0, 15.0), 0.01);
    }
    @Test
    @Severity(value = SeverityLevel.BLOCKER)
    public void testSub(){
    //fail example
    Assert.assertEquals(25.0, aCalculator.sub(10.0,15.0), 0.01);
    }
    @Test
    @Severity(value = SeverityLevel.MINOR)
    public void testMul(){
        Assert.assertEquals(250.0, aCalculator.mul(10.0,25.0), 0.01);
    }
    @Test
    @Severity(value = SeverityLevel.TRIVIAL)
    public void testDiv(){
        Assert.assertEquals(5.0, aCalculator.div(250.0,50.0), 0.01);
    }
    @Test
    @Severity(value = SeverityLevel.NORMAL)
    public void testReminder(){
        Assert.assertEquals(1.0, aCalculator.mod(25.0,3.0), 0.01);
    }
}
- In Allure report :
- In Graph:
- In individual test from both xUnit & Behaviors view :
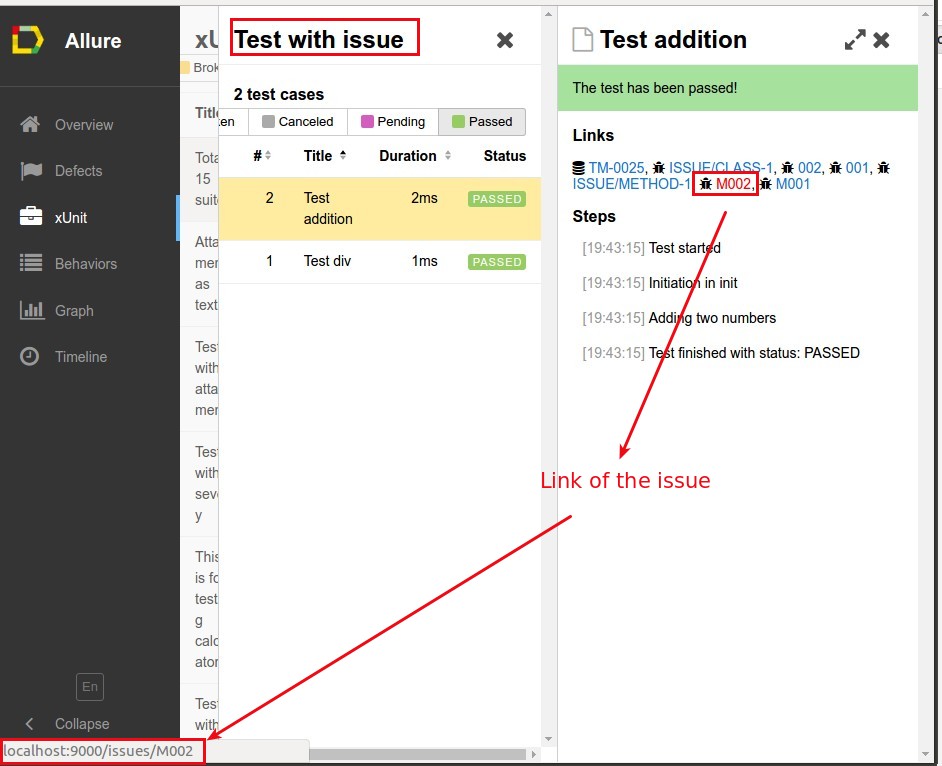
@Issue & @Issues : Both are used for attach single or multiple issues links respectively at the class or method level. There will be an external link tie with this. There is similar one @TestCaseId which applies to test method only.
-
Configuration : In allure.properties there are two entries which can be used for defining the issue tracker as well as test management tracker urls
  allure.issues.tracker.pattern=http://localhost:9000/issues/%s
  allure.tests.management.pattern=http://localhost:9000/tests/%s
The %s actually replace by the ID that we use with those annotations. Issues replaces tracker pattern and test case replaces management pattern entry.
Example:
This class represents these three annotations
@Issues(value = {@Issue(value = "001"), @Issue(value = "002")})// multiple issues
@Issue(value = "ISSUE/CLASS-1")//single issue
public class TestWithIssue extends TestingCalculator {
    @Test
    @Issue(value = "ISSUE/METHOD-1")
    @Issues(value = {@Issue(value = "M001"), @Issue(value = "M002")})
    @TestCaseId("TM-0025")
    public void testAddition() {
        Assert.assertEquals(25.0, aCalculator.add(10.0, 15.0), 0.01);
    }
    @Test
    @Issue(value = "ISSUE/METHOD-2")
    @Issues(value = {@Issue(value = "M003"), @Issue(value = "M004")})
    @TestCaseId("TM-0027")
    public void testDiv(){
        Assert.assertEquals(5.0, aCalculator.div(250.0,50.0), 0.01);
    }
}
- Allure view :
![]()
you can see , in both issue and test cases, those tracker configured URL %s part replaced by our annotated values.
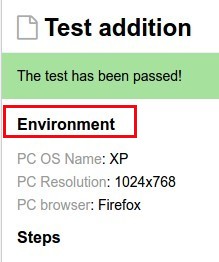
@Parameter : In allure we can set parameters which are not exactly test data as parameter rather test configuration/environment as parameter. Like , if you are testing in selenium, your browser/os parameters before starting the test can be used with this. And, of course with some trick, you can use this parameters in your tests. These parameters are shown in each test cases.
Example:
public class TestWithParameterDefaultExample extends TestingCalculator {
@Parameter("PC OS Name")
private String osName;
@Parameter("PC browser")
private String browser;
@Parameter("PC Resolution")
private String resolution;
@Test
public void testAddition() {
osName = "XP";
resolution = "1024x768";
browser = "Firefox";
Assert.assertEquals(25.0, aCalculator.add(10.0, 15.0), 0.01);
}
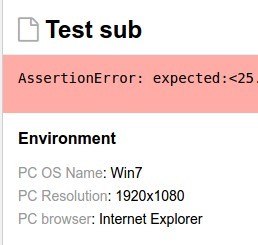
@Test
public void testSub(){//fail example osName = "Win7";
resolution = "1920x1080";
browser = "Internet Explorer";
Assert.assertEquals(25.0, aCalculator.sub(10.0,15.0), 0.01);
}
@Test
public void testMul(){
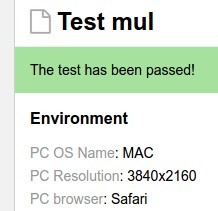
osName = "MAC";
resolution = "3840x2160";
browser = "Safari";
Assert.assertEquals(250.0, aCalculator.mul(10.0,25.0), 0.01);
}
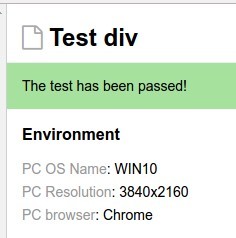
@Test
public void testDiv(){
osName = "WIN10";
resolution = "3840x2160";
browser = "Chrome";
Assert.assertEquals(5.0, aCalculator.div(250.0,50.0), 0.01);
}
@Test
public void testReminder(){
osName = "Ubuntu";
resolution = "3840x2160";
browser = "Firefox";
Assert.assertEquals(1.0, aCalculator.mod(25.0,3.0), 0.01);
}
}
Allure reports : under each of test
Note : In github project , you will see other 3 classes where I tried to use this as regular junit parameter and zohhak parameters. But it does not works with them. So, those examples are for showing where it does not work. So, please done get confused by allure parameter and test parameter.
@Attachment
With this , we can attach any screenshot/image or text in a test method level.
How it works?:
you method where you are using @Attachment, that should provide output either
- String => will direct attach the string , it has different variants (mine type ) like text/plain, text/html, application/json
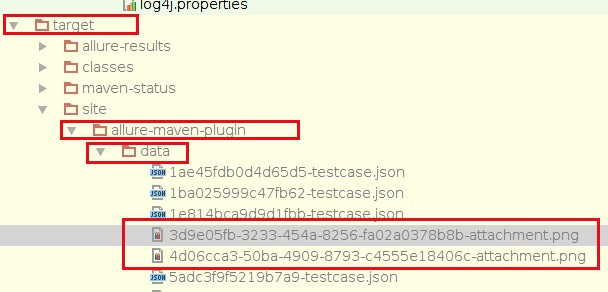
- byte[] => can be stored as image. So, here we use this for keeping as screenshot. And, if we look at target folder, we can actually see this.
And @Attachment takes another input which is name of this attachment. Default value is {method}, so if you don’t give any value, it will take method names. This is useful when we want to take screenshot for each step or just on failure.
Example 1 (Default) :
- Screenshot taking with method. I have made a helper class which actually takes screenshot and returns byte array . This the method :
public static byte[] capture() {
    byte[] out = null;
    try {
        BufferedImage screencapture = new Robot().createScreenCapture(
                new Rectangle(Toolkit.getDefaultToolkit().getScreenSize()));
        ByteArrayOutputStream bo = new ByteArrayOutputStream();
        ImageIO.write(screencapture, "jpg", bo);
        out = bo.toByteArray();
        bo.close();
    } catch (AWTException e) {
        e.printStackTrace();
    } catch (IOException e) {
        e.printStackTrace();
    }
    return out;
}
And , i am using this in our TestingCalculator abstract class to let all sub test classes use this. So, after adding those attachments, my TestingCalculator becomes
public abstract class TestingCalculator {
protected Calculator aCalculator = null;
@Before
@Step("Initiation in {method}")
public void init(){
aCalculator = new Calculator();
}
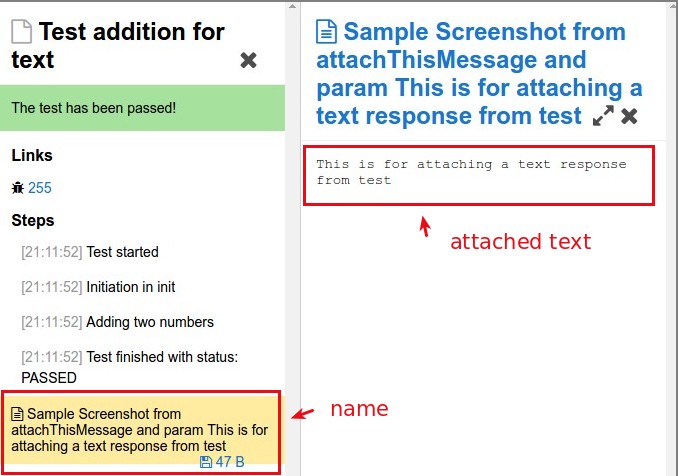
@Attachment(value = "Sample Screenshot from {method} and param {0}")
protected String attachThisMessage(String message){
return message;
}
@Attachment(value = "Sample Screenshot from {method}", type = "image/png")
protected byte[] capturePNG() {
return ScreenShot.capturePNG();
}
@Attachment(value = "Sample Screenshot from {method}", type = "image/jpg")
protected byte[] capture() {
return ScreenShot.capture();
}
@Attachment(value = "{0}", type = "text/html")
public static String attachHtml(String html) {
return html;
}
}
- And form the test method :
public class TestWithAttachment extends TestingCalculator {
    @Test
    public void testAdditionFail() {
        Assert.assertEquals(35.0, aCalculator.add(10.0, 15.0), 0.01);
        capturePNG();//the image attachment    }
    @Test
    public void testAddition() {
        Assert.assertEquals(25.0, aCalculator.add(10.0, 15.0), 0.01);
        capture();//the image attachment    }
    @Test
    @Issue("255")
    public void testAdditionForText() {
        Assert.assertEquals(25.0, aCalculator.add(10.0, 15.0), 0.01);
        attachThisMessage("This is for attaching a text response from test");//the text attachment    }
}
And, from allure we can see attachments links .

Note : As you can see, there are two capture implementation which are done by awt. So, if you are using selenium, use selenium web driver screenshot taking way.
To make post smaller, I am keeping following examples link only
Example 2:
Direct screenshot from test method. This should not be default behavior because junit validated each test cases with void output, so if you are returning byte[] or string, this will show error. So, what i did, i made custom runner which does not checks this and run test with this runner. So, my runner link. Test class link.
Example 3 :
In example , i make my own test rule to listen junit event for each step and i can take screenshot. It may not look useful in this example but it is widely used for selenium based tests where each step screenshot might be useful. This can modified for screenshot on test fail only rules. So, my test rule link. And test class link.
Configuration/Properties :
The default allure property configuration should be present in allure.properties file which i have kept in resources. In their you will see other properties which i use but this is default use by allure. It will be loaded by default so, beside properties inside pom.xml, we can use this to send properties.
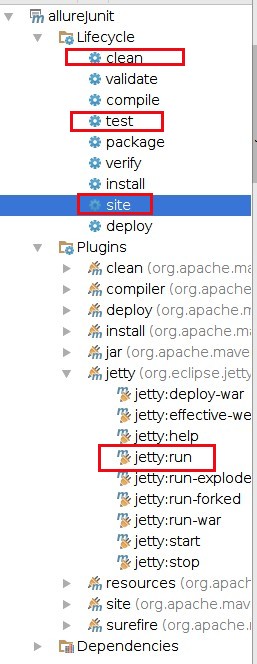
Maven Run Commands :
- To clean project : mvn clean
- To run tests : mvn test
- To build site : mvn site
- To show results in browser with jetty server : mvn jetty:run
if you goto your browser http://localhost:9000 , you can see the report. You can also use Intellij IDEA maven tool UI
What happens with allure when we run : mvn test
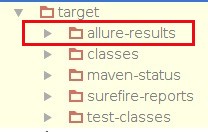
This folder contains all test results by Junit Listener (by default). We can change this directory configuration in allure.properties
allure.results.directory=<your desired location>
What happens with allure when we run : mvn site
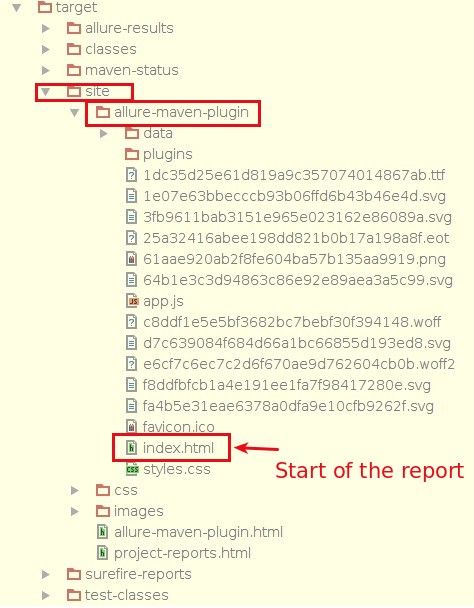
So, when we go http://localhost:9000, it points to index.html.
Thanks :)